Verifying Consumers
For a consumer token to be used to get PII data about a consumer's friends (email, name, conversion history), the token must be verified to belong to the consumer.
Overview
Extole is designed to allow anyone to be able to share and participate in referral and engagement program with as little registration or verification as required. For example, this means that for an advocate to be able to share, the advocate should by default not need to log in, register, or "prove" their identity in any way.
Levels of Verification
A person has three verification levels with Extole:
- Anonymous: They have an access token which is tied to their device, typically via cookie. This person has no email address or
partner_user_idassociated with their token. They are unknown. Typically, these people can only see basic creatives aspects of your program, such as CTAs, the Share Experience, and the Friend Landing Experience, but cannot take actions like sharing. - Identified: Once a person is identified, typically by an email address, they are able to get a Share Link and share through Extole. Our security model takes into account that it's easy for a person to enter someone else's email address. This person has access to session information, but does not have access to any PII or other private information that may be associated with them.
- Verified: This consumer has proven their identity. Once identity is verified, this person has access to all information associated with themselves, such as historical shares and rewards.
Verification Methods
Program participants must be able to verify their identity to have access to information they may have entered in a previous session or details like who they have emailed, what rewards they have earned, and so on.
Extole supports three methods of verifying identity:
- Email Verification: In this method, Extole will email the participant with a link that has an authentication token. When the they click on this link, they become verified as the owner of the email and can view any history associated with that email address.
- JSON Web Token (JWT): In this SSO method, you are responsible for verifying the identity of participants, typically via login. Once a participant is logged in, then a secure SSO token is sent to Extole through web request or API that has been digitally signed by a shared key or PKI. Extole is then able to validate the signature of the token and know the person has been authenticated on your end. Extole also supports JWE tokens for identification verification in cases where the content of the JWT should be encrypted.
- Explicit Authorization (Resource Owner Credential Grant): In this OAuth pattern, the Extole Authenticated API may be used to mark a token as verified. This allows, for example, an advocate behind login to see their referral stats without any need to log in.
Using JSON Web Tokens (JWTs)
JSON Web Tokens are an open, industry standard RFC 7519 method for representing claims securely between two parties. Follow the steps below to implement JWTs in your My Extole account.
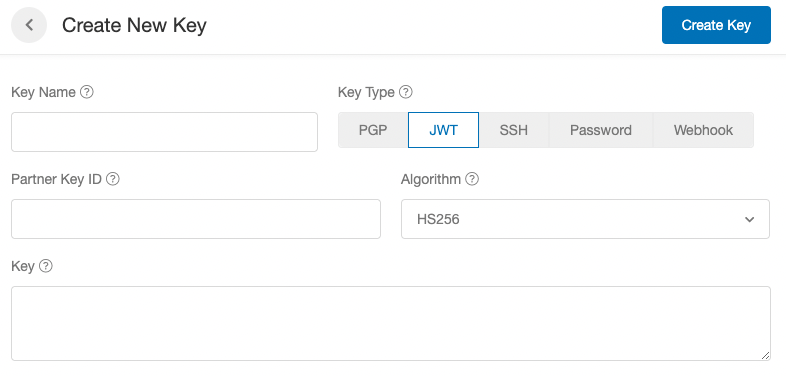
- Create your JWT Key. Extole supports all major algorithms for JWT keys. The most common is an HS256 shared key.
- Upload your JWT. Go to the Security Center and, under the Keys section, hit the + New Key button.
- Fill out the necessary fields to upload your JWT.

Ensure you set the Partner Key ID field to the value you will send in the kid header field. Extole uses this to identify which key should be used for verification and or decryption.
JWT Generation
There are many popular libraries that can be used to generate your JWT. A JWT contains a header section, a payload section, and then signature section.
If you are generating a x509 Key Pair, you will need to upload the public key as DER base64 encoded. You can use OpenSSL to do this:
$ openssl rsa -in rsa.private -out rsa.public -pubout -outform DER
$ base64 rsa.public
JWT Header
The following is an example JWT header for you to reference.
{"alg":"HS256","typ":"JWT","kid":"jwt-key-20191122"}| Key | Value |
|---|---|
alg | The algorithm of the key. Extole supports most algorithms, but the most common is HS256. |
typ | The type of key which will always be JWT. |
kid | They Key Identifier. This is the identifier you provided for your key in My Extole as the Partner Key ID, for example, jwt-key-20191122. |
JWT Payload
The payload of the JWT contains information like email address, which is used as the identifier for the person and will enable the person to become verified.
If the JWT is expired (i.e., the exp time is in the past), Extole will still use the email provided to identify the user but the user will not be verified and will not be able to see PII. This can be helpful when JWTs are used inside of emails.
The following is an example JWT payload for you to reference.
{
  "email":"[email protected]",
  "exp":"1582826704",
  "nbf":"1582826344",
  "iat":"1582826404"
}| Key | Value |
|---|---|
email | The email address of the person you are asserting identity for. |
exp | The expiration date of the key. Extole uses NTP and we typically recommend this is set between 1 and 5 minutes in the future. This is up to you to determine according to your security policies. |
nbf | Key is not valid before this time. Extole uses NTP and we typically recommend this is set 1 minute in the past. |
iat | Issued At is the time the key was issued. |
JWT Payload via Tags
Extole can also accept JWTs in zone requests (i.e., when creative aspects of your program are rendered). Data passed in a JWT takes precedent over what is passed in the data section of a tag.
<script type="text/javascript">
  /* Start Extole */
  (function(c,e,k,l,a){c[e]=c[e]||{};for(c[e].q=c[e].q||[];a<l.length;)k(l[a++],c[e])})(window,"extole",function(c,e){e[c]=e[c]||function(){e.q.push([c,arguments])}},["createZone"],0);
  /* End Extole */

   extole.createZone({
     name: 'embedded_stats'
     element_id: 'extole_zone_embedded_stats',
     jwt: 'eyJhbGciOiJIUzI1NiIsInR5cCI6IkpXVCJ9.eyJlbWFpbCI6ImpyZWVkQGV4dG9sZS5jb20ifQ.yow8b4bvczz87F3sQKxdJvMSWicPEfV95Zo1iuethwA'
  });
</script>
Testing Your JWT
Once your JWT has been generated and signed, you'll be able to test it.
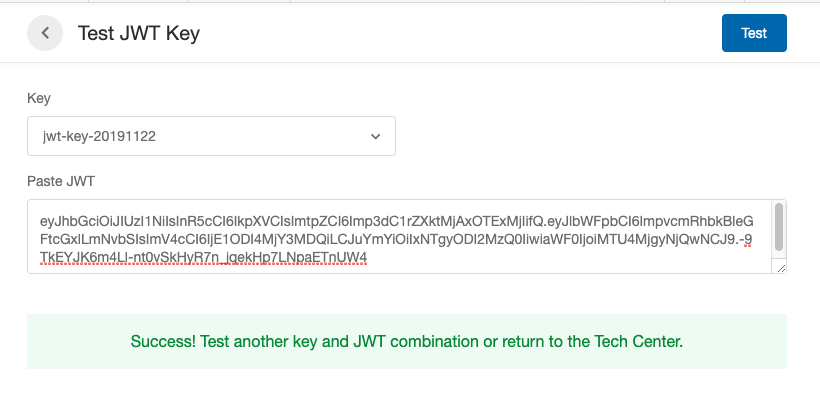
- Within the Security Center, click the Test JWT button.
- Select your newly created key from the drop down and paste your key into Paste JWT field.
- Hit the Test button to verify it works or see an error.

Updated 3 months ago
