Tealium
Set up Extole functionalities on your site using Tealium.
Overview
Extole and Tealium have partnered together to ensure that implementing Extole on your site is as easy as possible and follows standard Tealium workflows you are already familiar with. Simply access the Extole app directly from Tealium.
Tealium and Ad BlockingIt is worth being aware that as the internet has grown more privacy conscious some of the more aggressive privacy blockers include Tealium in the list of tools that are blocked.
For example the Lowe Block List includes Tealium in the default block list, and this list is included in the defaults of uBlock Origin.
As an alternative it's possible to use the direct tagging guide to place tags directly onto your website.
Prerequisites
| Requirement | Description |
|---|---|
| Tealium Account | Access to and familiarity with the Tealium platform. |
| Extole Account | An Extole account is required to leverage this integration. |
Integration
Launch the Extole App
Log in to your Tealium account and complete the following steps.
- In the main left-hand menu under iQ Tag Management, click on Tags.
- From the Tags page, find the option to + Add Tag in the upper-right corner.
- Press this button to open the Tag Marketplace.
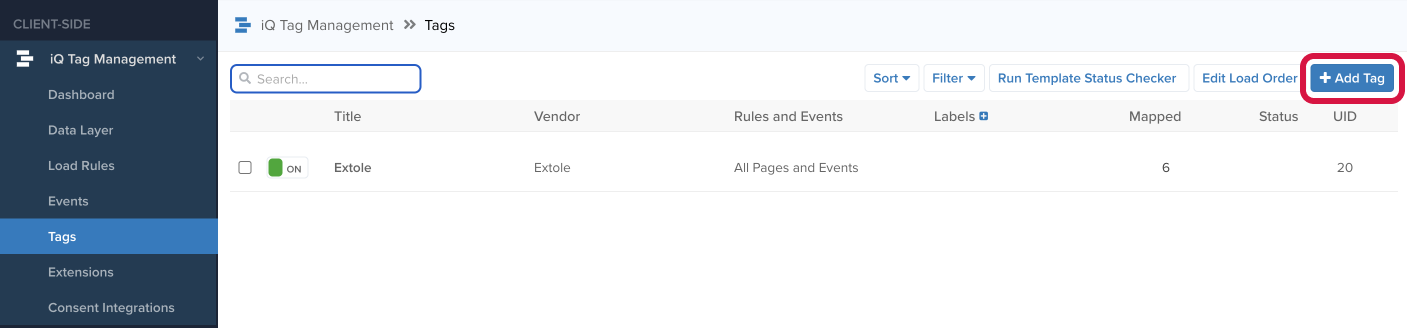
Tealium Tags page
- Type Extole into the search bar and hit the + Add button.
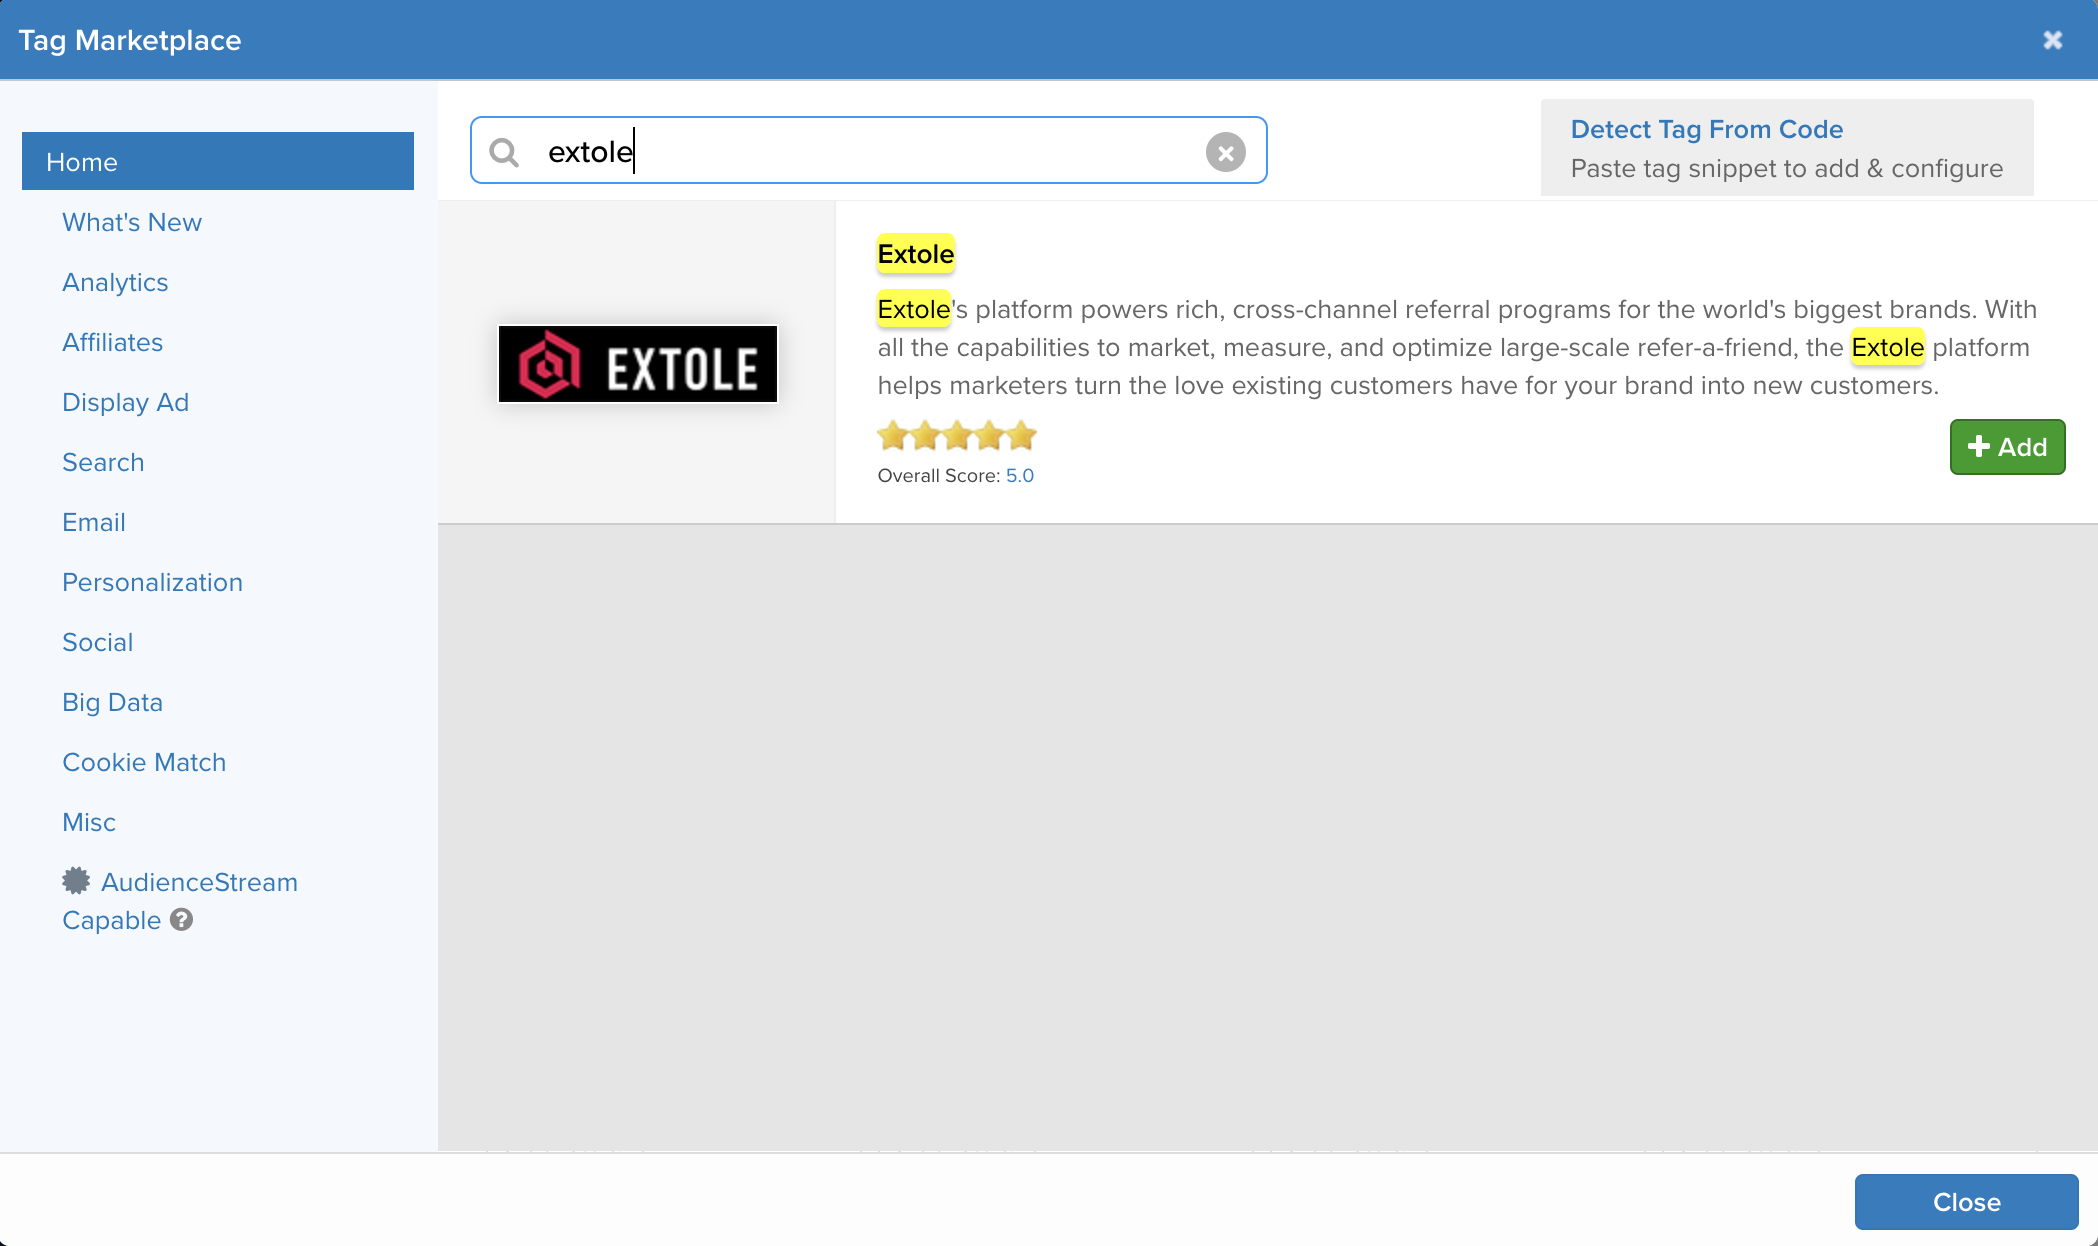
Tag Marketplace in Tealium
Configure Extole Tags in Tealium
Once you've added Extole from the Tag Marketplace, you'll see the main configuration screen (pictured below). This page will allow you to provide your Extole client name, which configures the Tealium App to connect to your account at Extole.
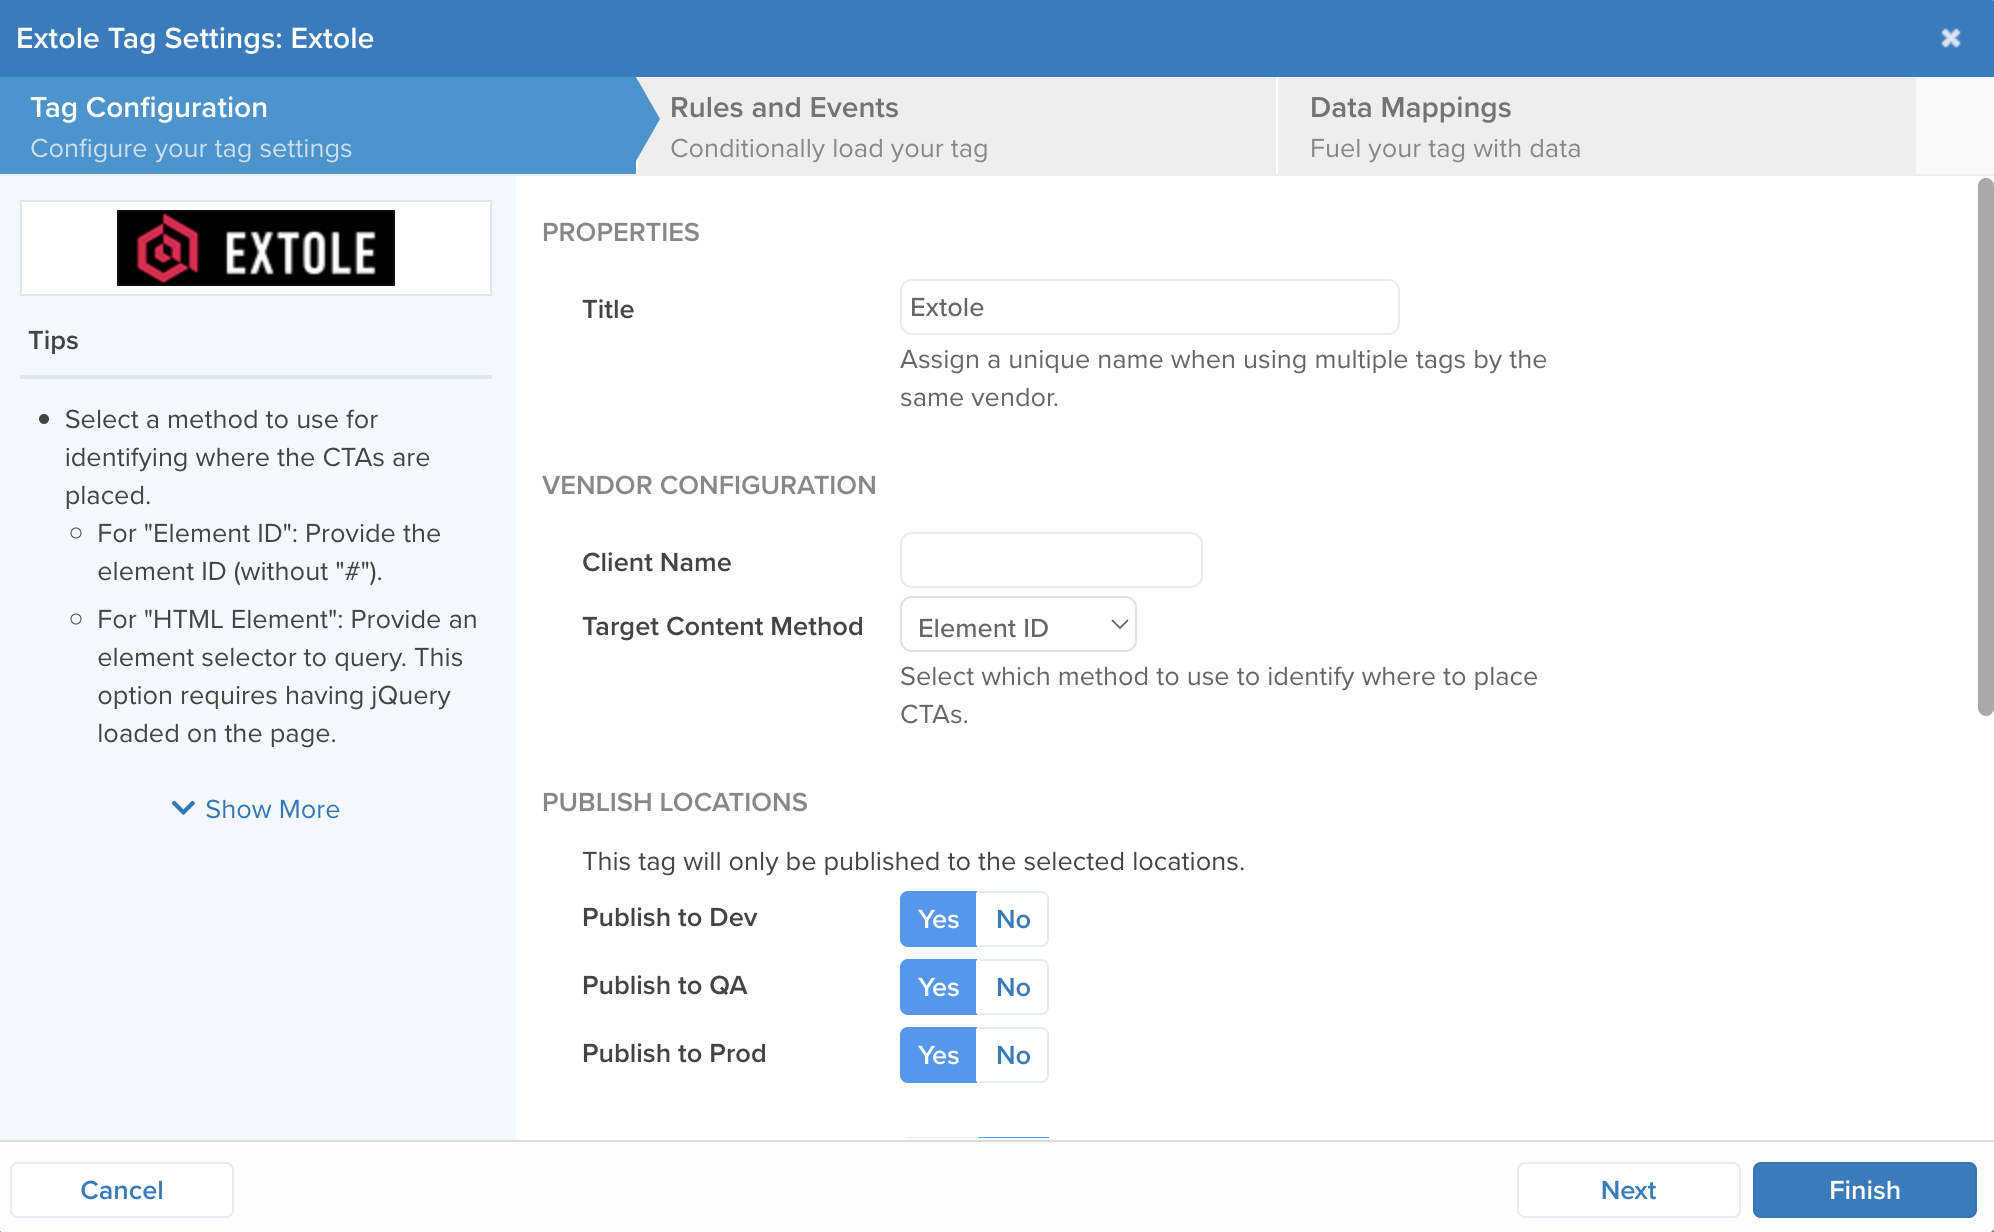
Tag Configuration page in Tealium
What's my client name?Your Extole client name is your branded or unbranded program domain, without the https://. Ex: tealium-tags.extole.io

Extole program domain on the Tech Center page
Add the Extole Core JavaScript Library
Once you've added the Extole Tag, make sure that Extole's core tag is placed onto all of your pages. This tag is used to activate the Extole system and ensures that any other Extole tags on your pages work properly. It also detects when someone has come to your page through a referral, and automatically serves the friend landing experience.
Add In-line Marketing Tags
Marketing tags tell Extole where to display promotions or content that encourages participation. Marketing tags also enable attribution tracking, so that you can know which promotions are driving participation in the program.
An Extole campaign comes with standard marketing tag names:
global_headerglobal_footerproductoverlaymobile_menu
It's easy to create additional marketing tags if you want to add calls to action to additional pages like your blog, help pages, etc. As you're getting started, contact your Customer Success Manager to help learn how.
Global Header
This is placed in the header on all pages of your site, both for desktop web and mobile web.
HTML Placement
In order to make the content display in a specification place on your page, you'll need to place HTML on the page in the location where you would like the CTA to appear.
Let's take the global_header CTA as an example. This CTA is You'll need to place HTML on your page which is identified by extole_zone_global_header you would place the following snippet of HTML in the required location on the page.
<span id="extole_zone_global_header"></span>Configure your Extole Tag Data Mappings in Tealium
Tealium tags are used to target content into the locations you specified in your HTML placement. The tags will read information from the data, so you will need to create a Mapped Variable that holds the value of extole_zone_global_header.
In your Tealium account, navigate back to your Tags page and expand the Extole Tag.
- Find the Mapped Variables section and hit the Edit button.
- Open the Variables drop down and click on the + Add Variable button. Make sure the Type is UDO Variable and type in
extole_zone_global_headerfor the Source. Hit Apply.

Adding a Global Header Zone to Mapped Variables in Tealium
- Next, go to the Extensions tab in the left-hand main menu (below Tags). Click the + New Extension button.
- Find the extension type Set Data Values and hit + Add. Name it Extole Element Targets.
- Under the Configuration section of the extension, set the value of
extole_zone_global_headerto the Text value ofextole_zone_global_header.
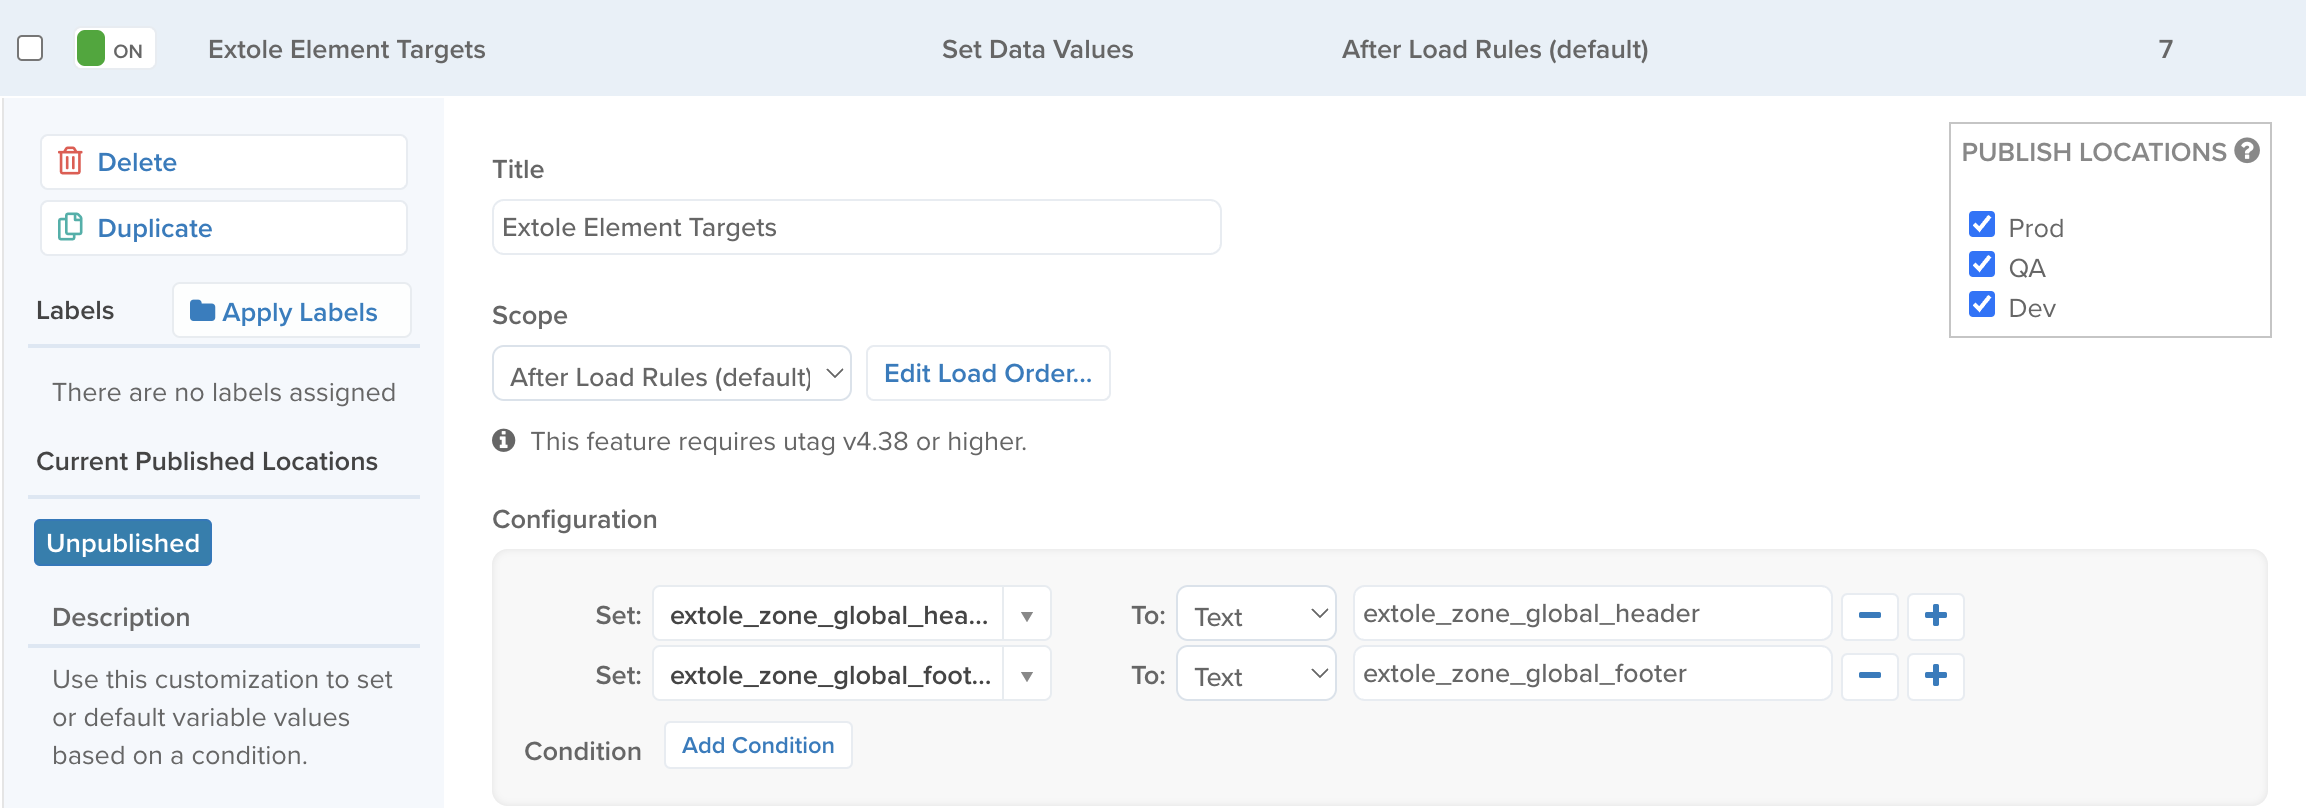
Setting up an Extension for the Global Header Zone in Tealium
- Go back to the Tags tab and open the Extole Tag. Go to your Mapped Variables and select the variable
extole_zone_global_headeryou created earlier. - Click the + Select Destination button and choose the Category for Calls-To-Action.
- Check the option for Global Header and hit Done.
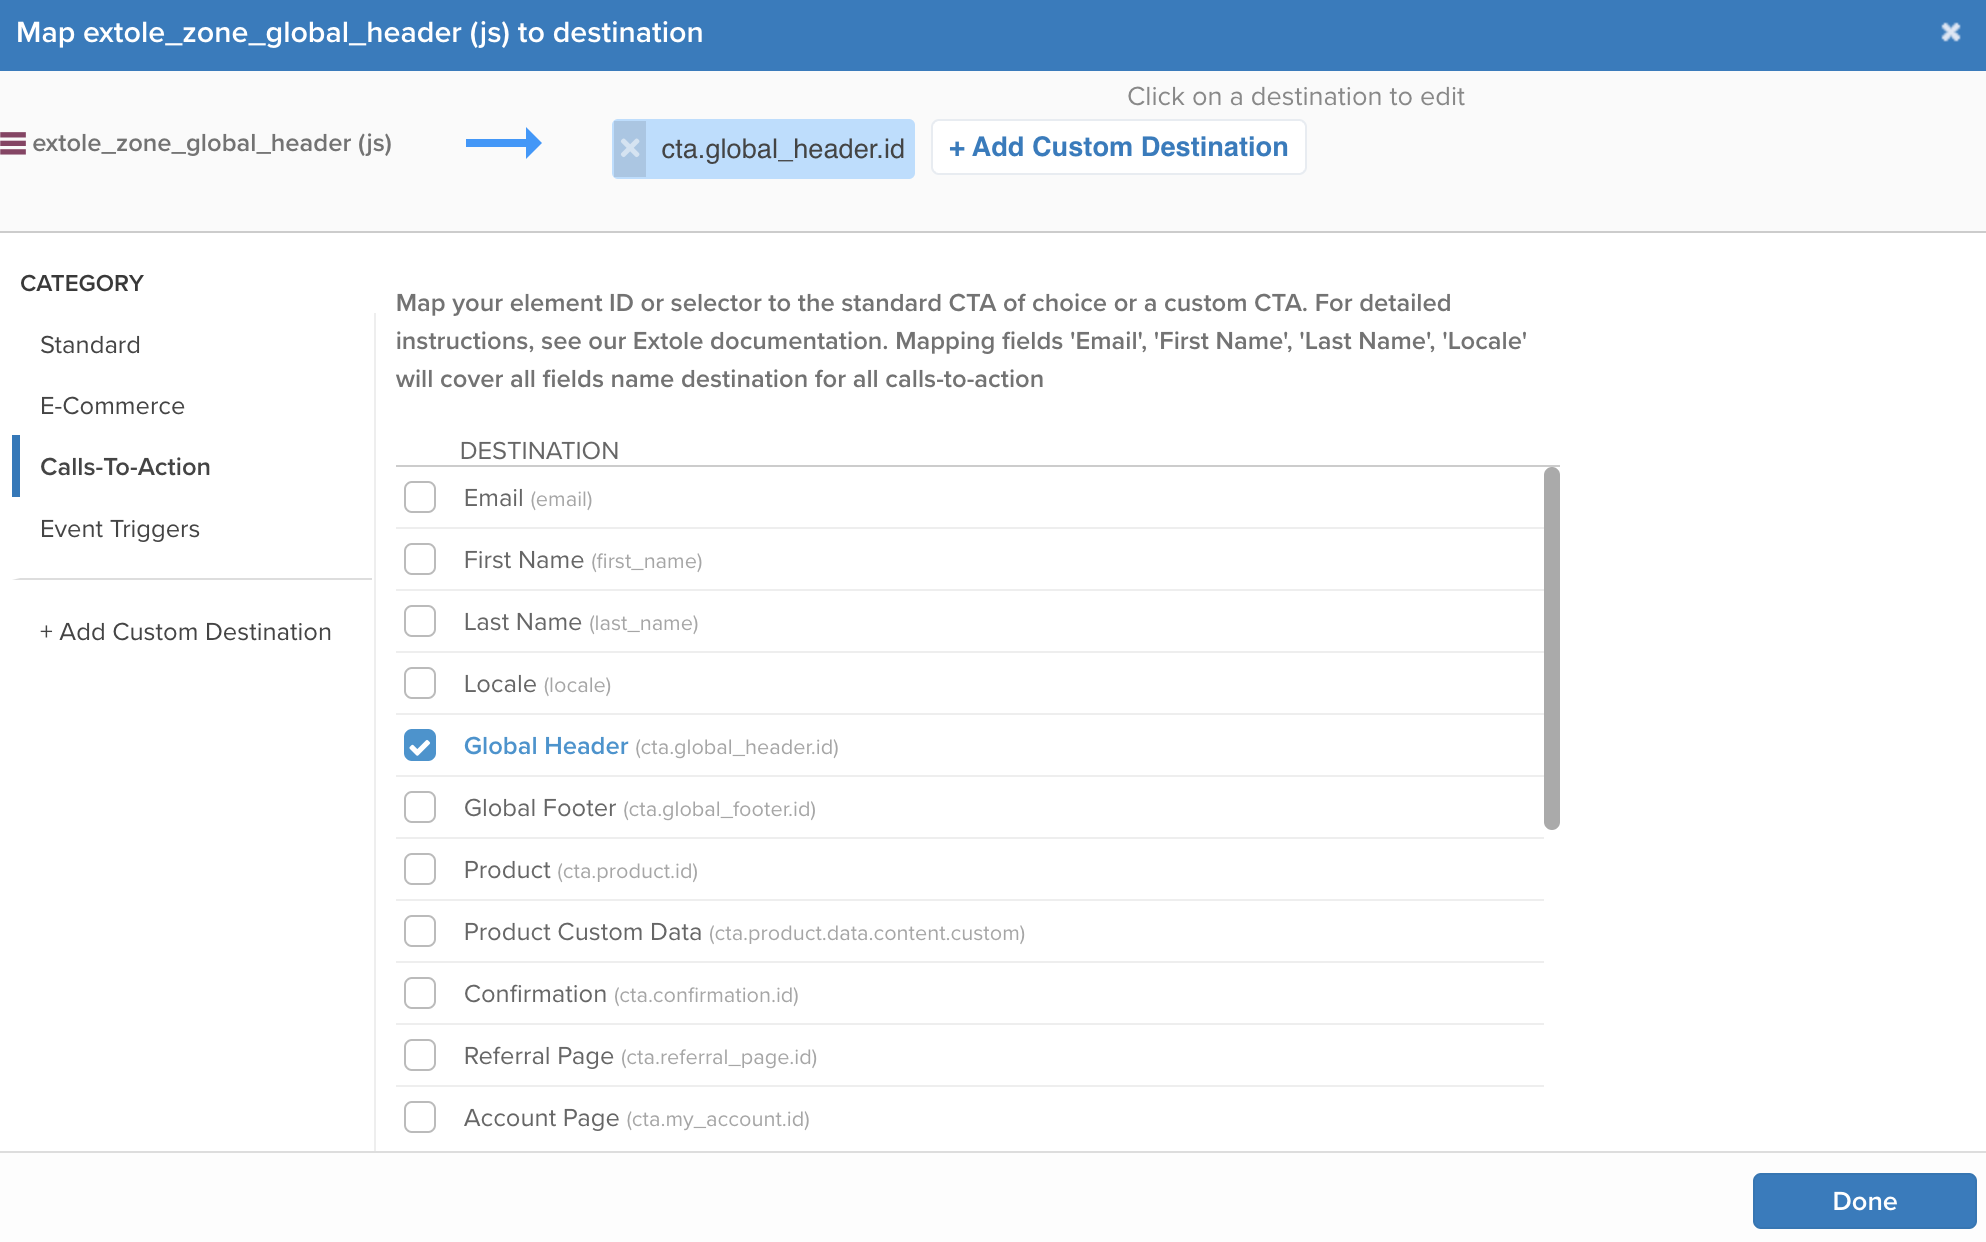
Confirming the Destination of the Global Header Zone in Tealium
Create Additional In-line Marketing Tags
Repeat the process above for each marketing tag you would like to include (e.g., header, footer, overlay, etc.).
Add Triggered Marketing Tags
Triggered marketing tags do not have in-line content on the page, instead they automatically overlay the sharing experience when the appropriate trigger occurs. These are setup the same as the in-line marketing tags except that the value of the ID will be n/a.
An Extole campaign comes with a standard triggered marketing tag name: confirmation.
Adding the Confirmation Zone
The Confirmation Zone is placed on the purchase confirmation page. You can also place this as a custom tag. It differs from the Everywhere zone in that it's targeted to a specific page. This is achieved by passing the trigger through the data layer on the desired page either by putting the trigger in the page javascript or by using a conditional Data Value extension.
- Just like for the global header, create a new Variable named
extole_zone_confirmation
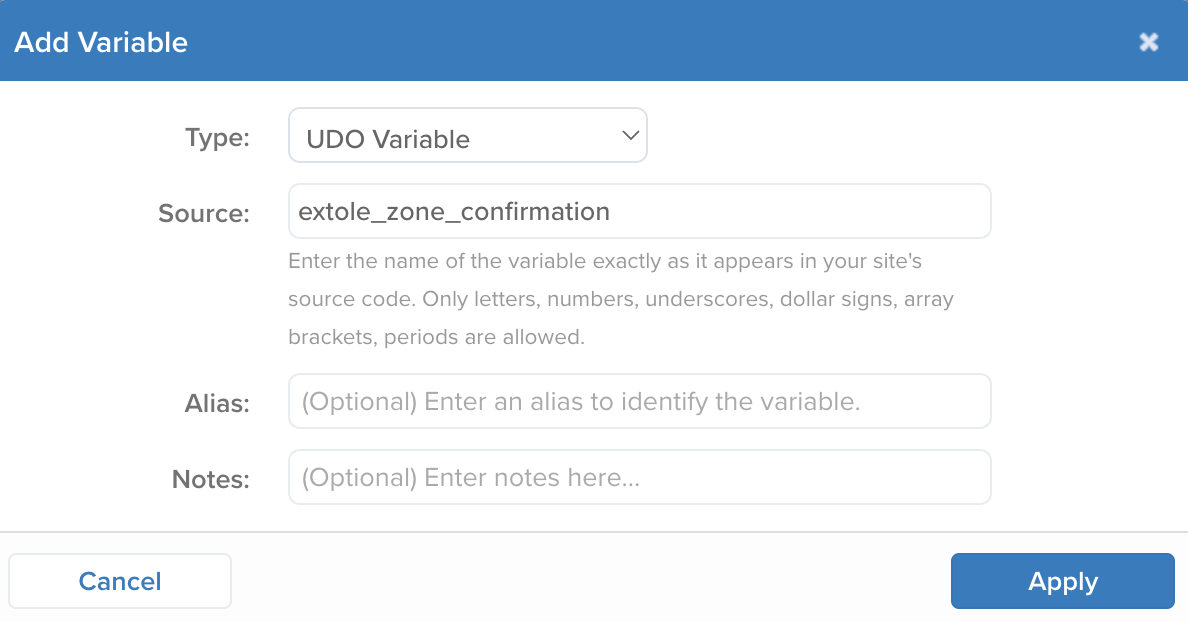
Adding a Confirmation Zone to Mapped Variables in Tealium
- On your purchase confirmation page, you will need to pass the value
n/ainto this data layer variable. This can be done in theutag_dataon the page, but can also be done through aSet Data Valuesextension with a condition. - In the Extensions tab, create another
Set Data Valuesextension and name itExtole Confirmation Target. - In the Configuration section, set the value of
extole_zone_confirmationto the Text value ofn/a. - Set the condition to be a when your purchase confirmation page is present. This can be through the use of URL path conditions or other variables.
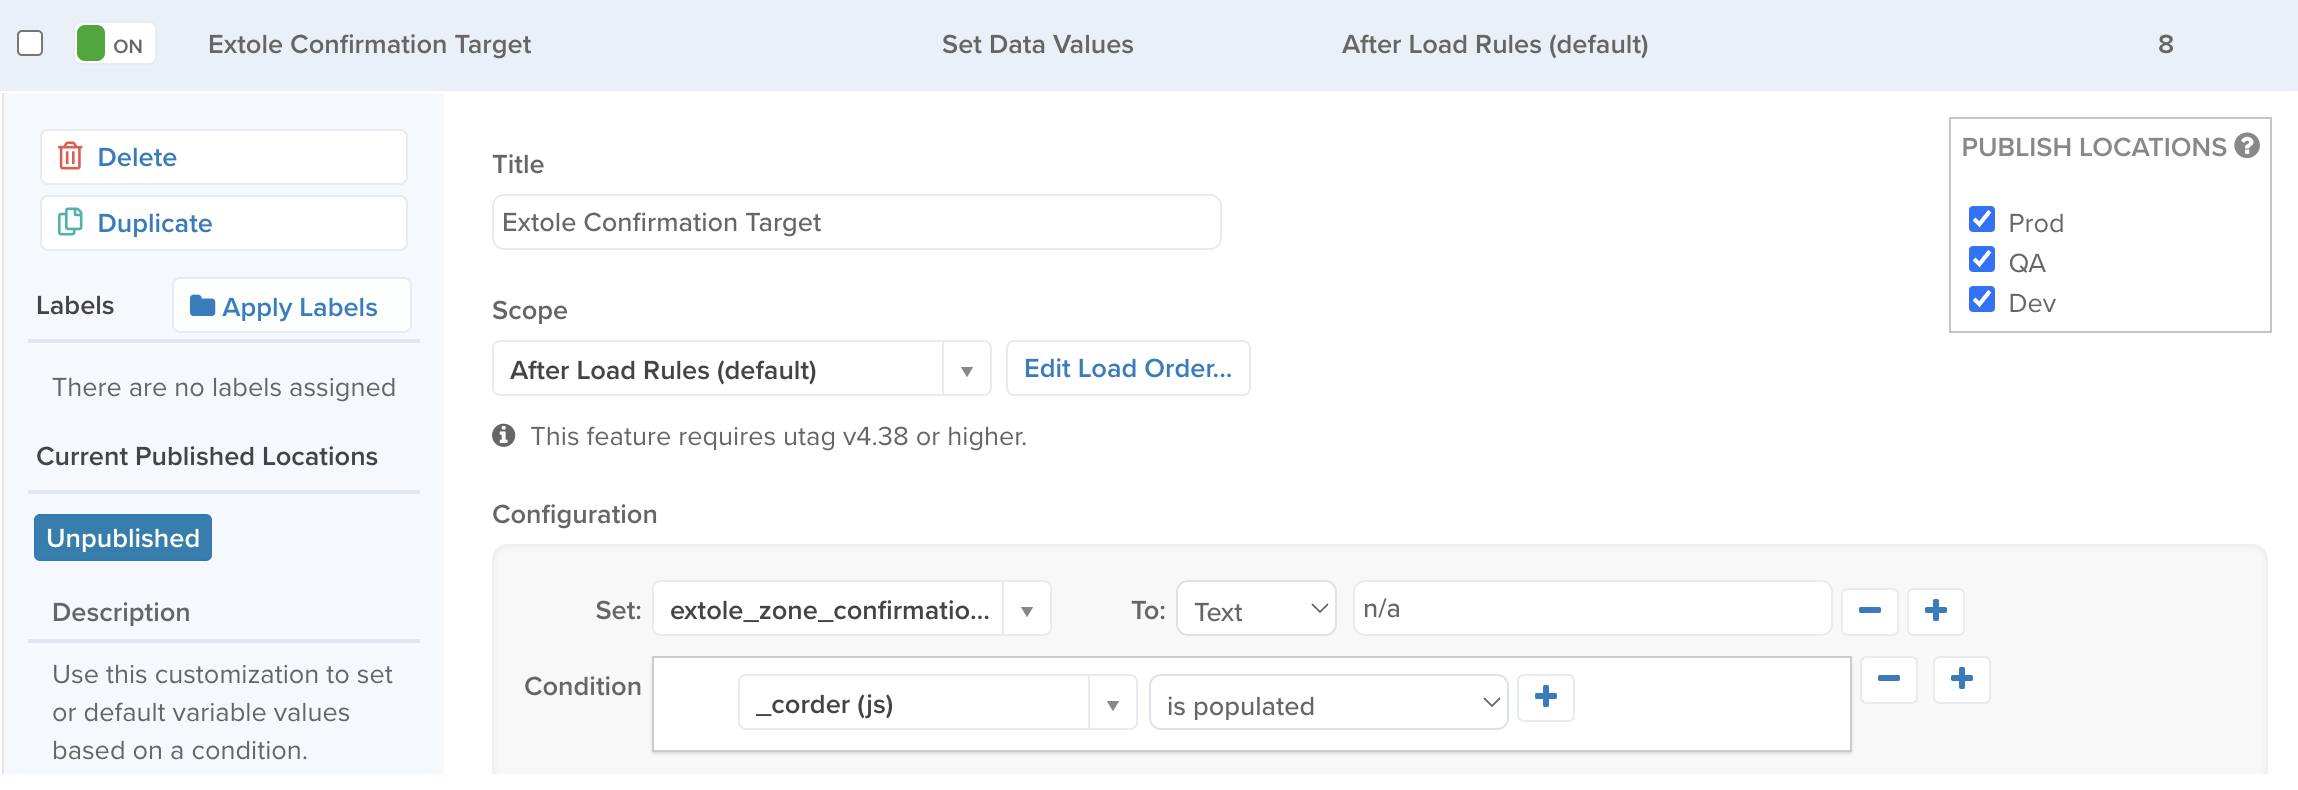
Setting up an Extension for the Confirmation Zone in Tealium
- Go back to the Tags tab and Edit the Extole Tag and switch to data mapping.
- Select the variable
extole_zone_confirmationand tapSelect Destination - Choose
Calls-to-Actionfrom the left menu and selectConfirmation (cta.confirmation.id)
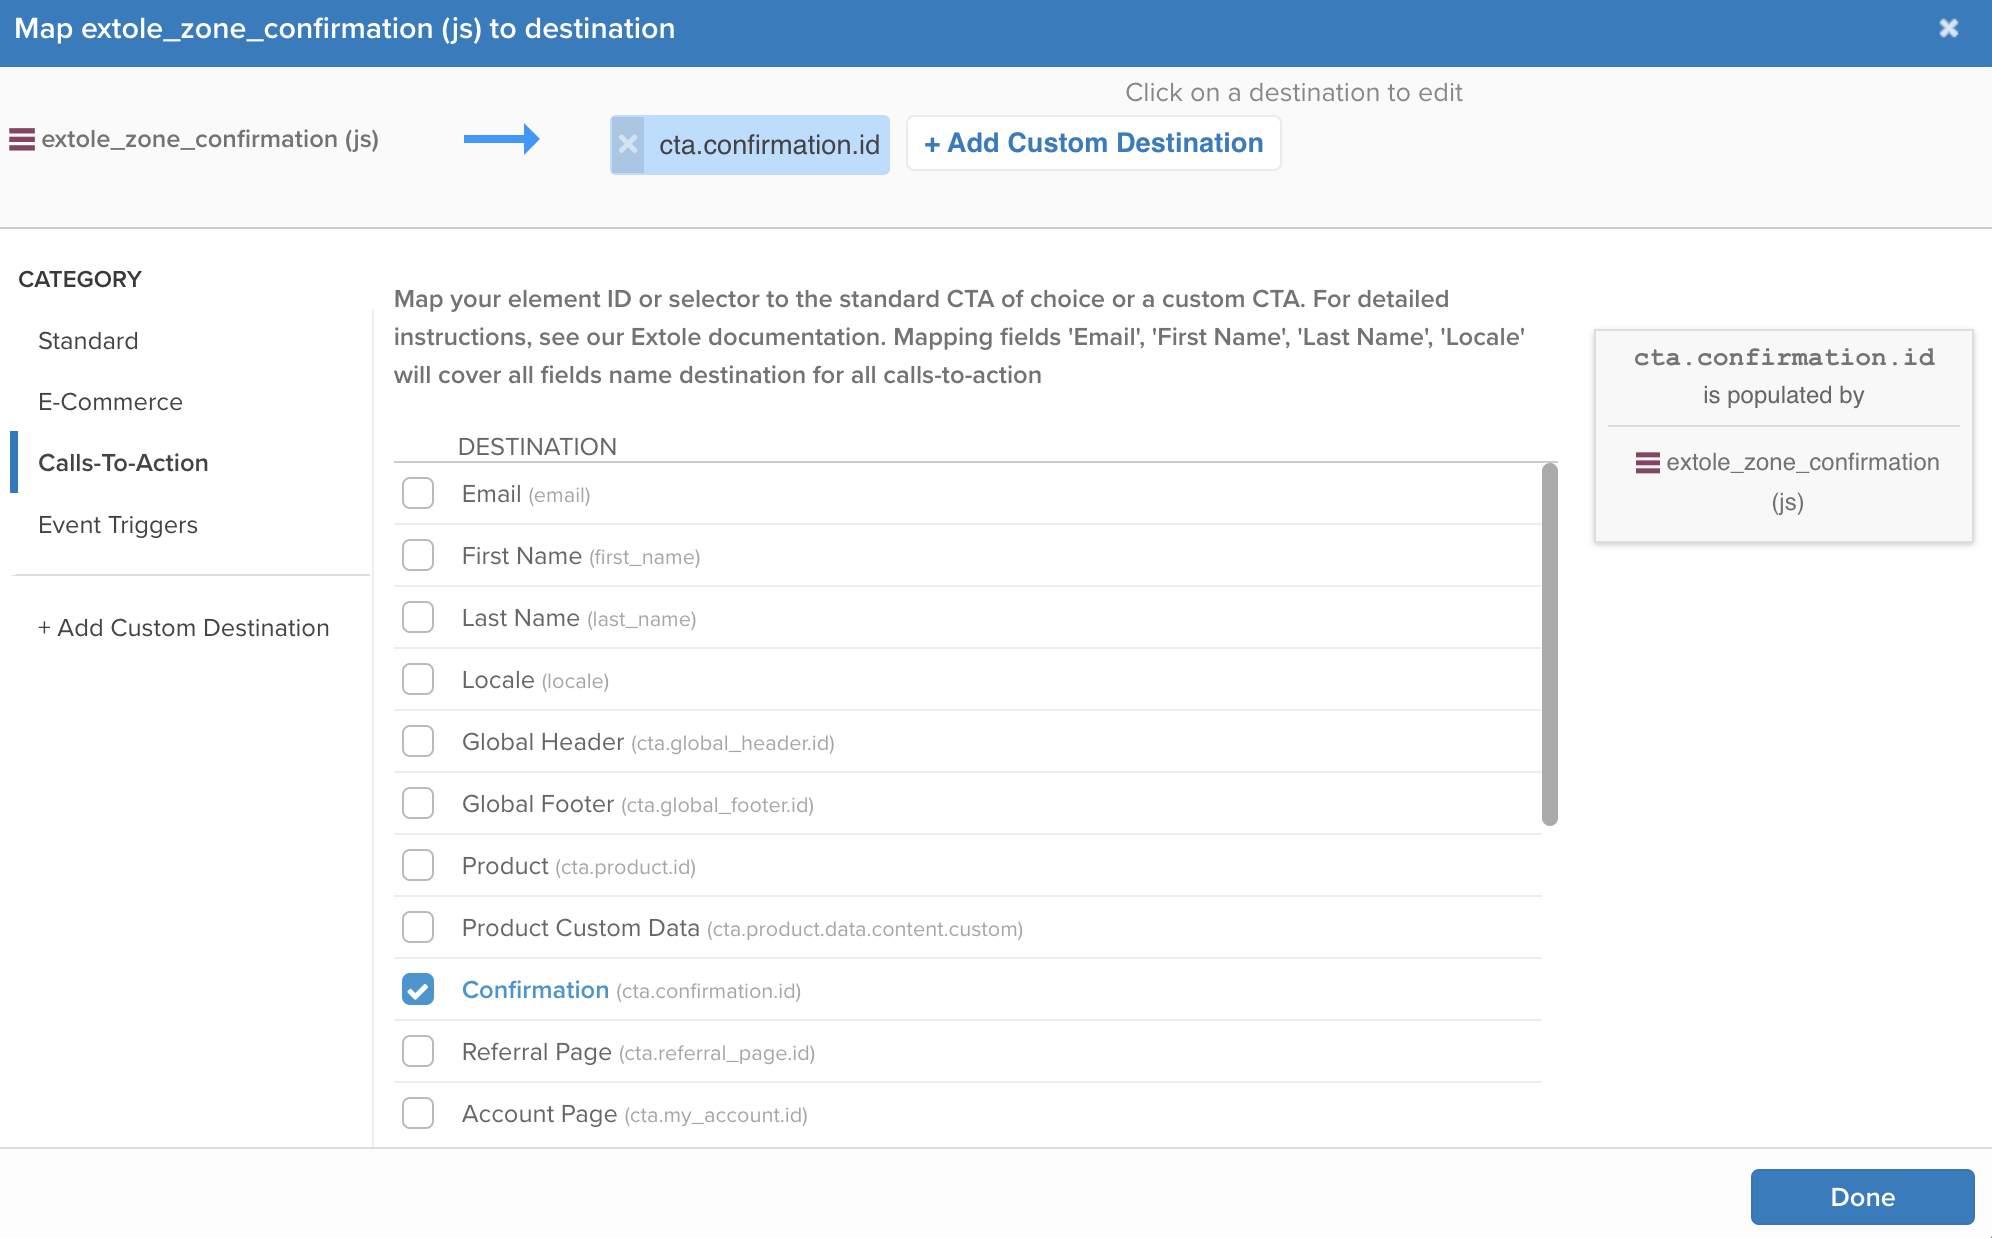
Confirming the Destination for the Confirmation Zone in Tealium
Add Event Tags
Include a Conversion Tag at Checkout
In order to reward advocates when a friend makes a purchase, you need to communicate to Extole that a purchase has happened by adding the Conversion Tag to your order confirmation page.
The conversion tag passes information about the purchase to allow Extole to attribute the conversion to a referral when possible, run quality rules, and run reward rules. Extole ignores the conversions that are not attributed to a referral after processing the rules.
The Extole Tealium tag works with the Tealium E-commerce extension to map a value to Order ID. When this value is populated with a value, the conversion tag will fire automatically (ex: on the order confirmation page, a value is pushed into order_number which is mapped to Order ID in the E-commerce extension).

The E-Commerce Extension configuration menu
Set Up Additional Mapped Variables
Extole tags require dynamic information that provide context on your site’s user and conversion details. Tealium offers an easy way to define and manage the necessary JavaScript variables, HTML elements, URL parameters and other sources that are required to define Extole tags and filter triggers. The specific configuration of your variables will depend on how your site provides data to Extole.
The table below lists the Extole data you will need to create in Tealium as Mapped Variables.
Variable | Description |
|---|---|
| The first name of the person making the zone request. This would typically be the advocate on a CTA zone, or the friend on a registration or conversion zone. |
| The last name of the person making the zone request. This would typically be the advocate on a CTA zone, or the friend on a registration or conversion zone. |
| The email of the person making the zone request. This would typically be the advocate on a CTA zone, or the friend on a registration or conversion zone. |
| This is the unique ID passed to Extole as the |
| This is the unique order number passed to Extole as the |
| Used on a conversion (purchase) event to track the value of the purchase for revenue reporting. |
| This is the coupon code, which is most commonly used on a registration or conversion tracking call. It will also be used as a method to tie the register/purchase back to an advocate. |
You will need to map each of the data items in the table above into your Tealium Extole Tag.
Example
- In your Tealium account, go to the Tags tab and open the Extole Tag.
- Find the Mapped Variables section and hit the Edit button.
- Add your first variable. Let's start with
first_nameas an example.

Adding first_name to Mapped Variables in Tealium
- Hit the + Select Destination button and, in the Calls-To-Action category, check the option to Add CTA Custom Data.
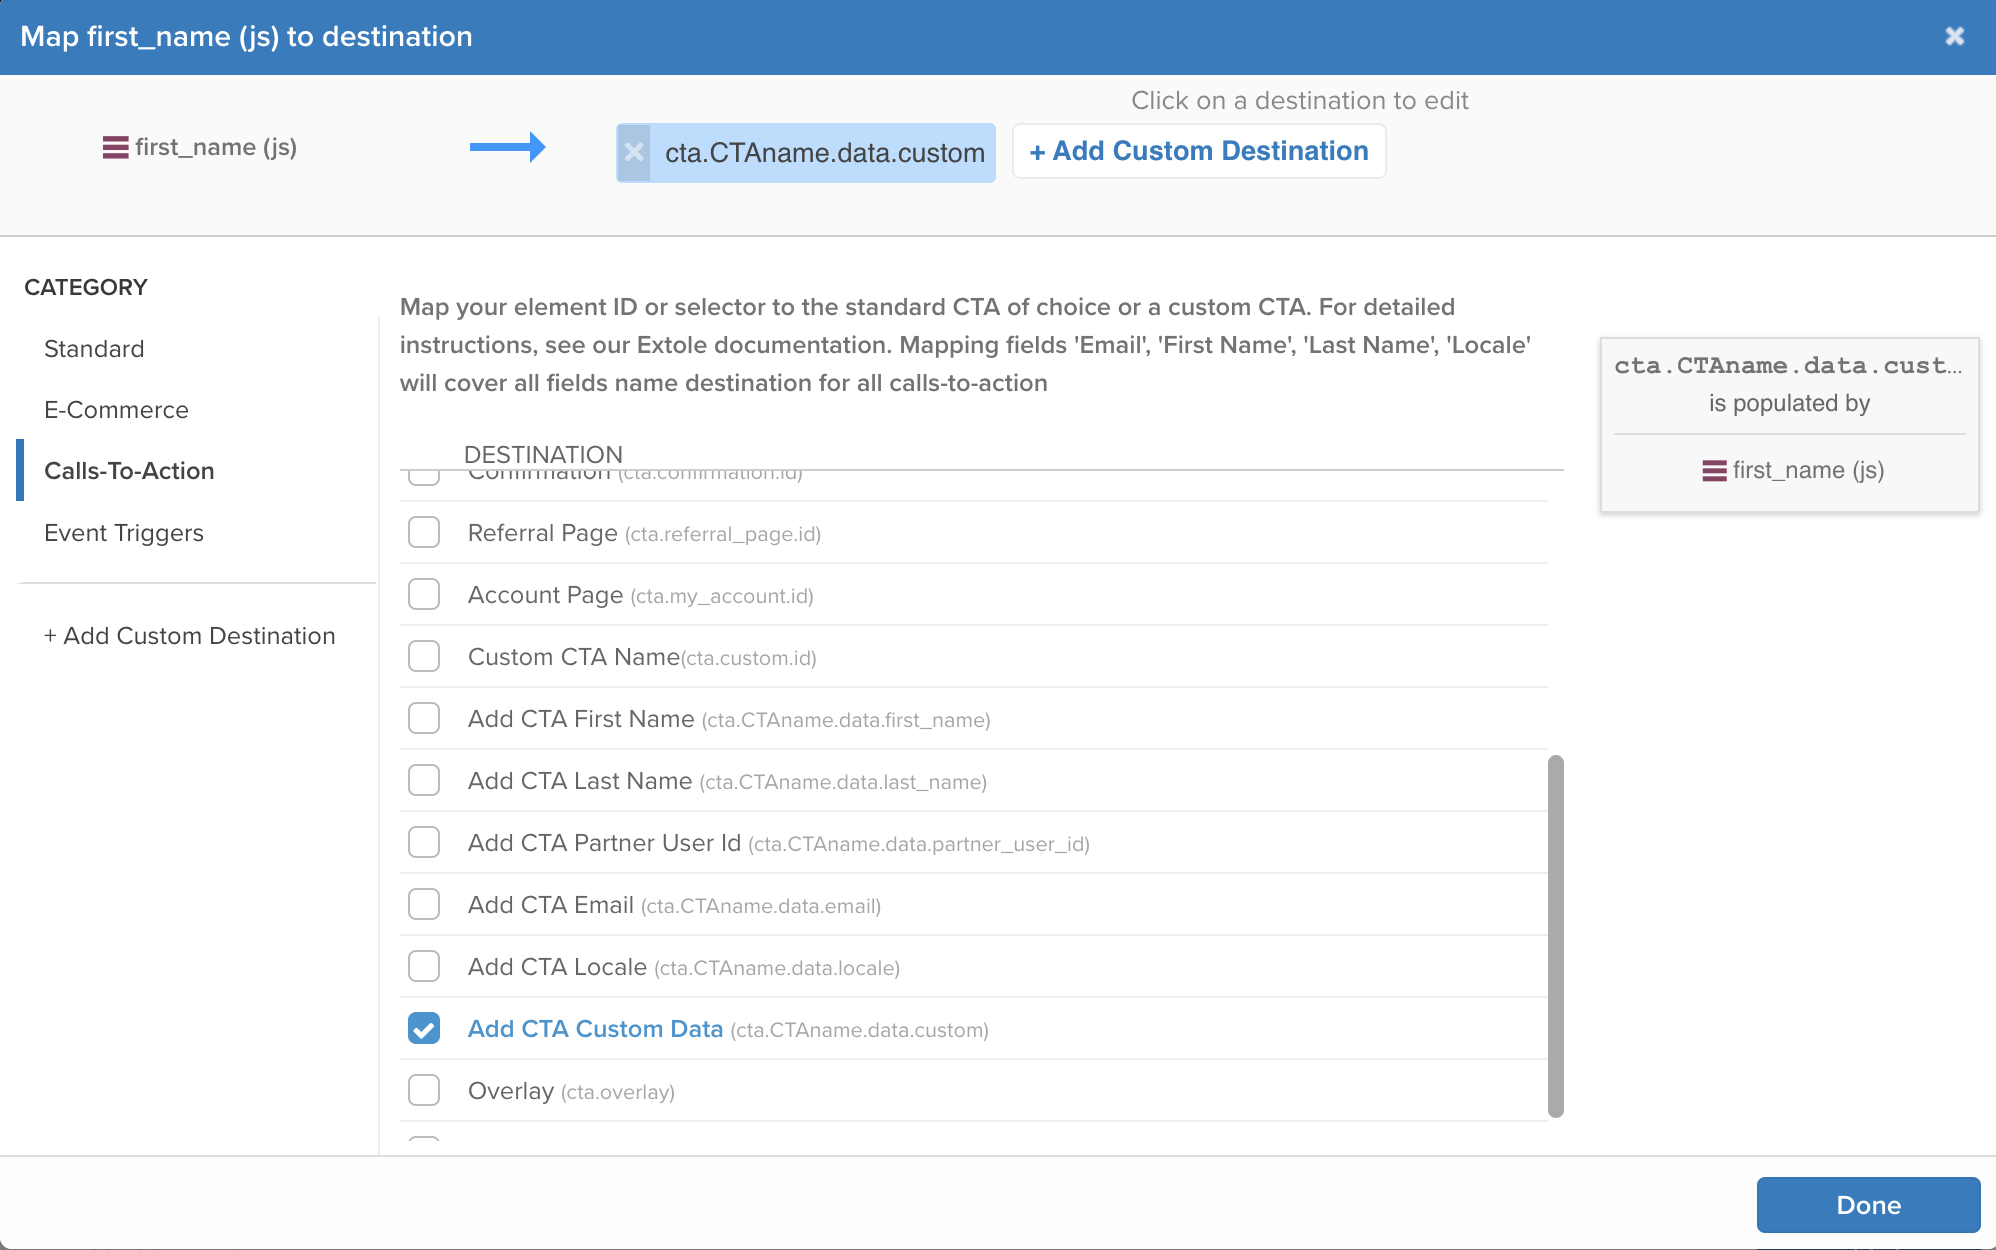
Setting Custom Destinations for first_name in Tealium
- A placeholder destination,
cta.CTAname.data.custom, will appear. Click on change it to change the custom destination tocta.global_header.data.first_name. - Hit the + Add Customer Destination to add
cta.global_footer.data.first_name,cta.product.data.first_name,cta.confirmation.data.first_name.
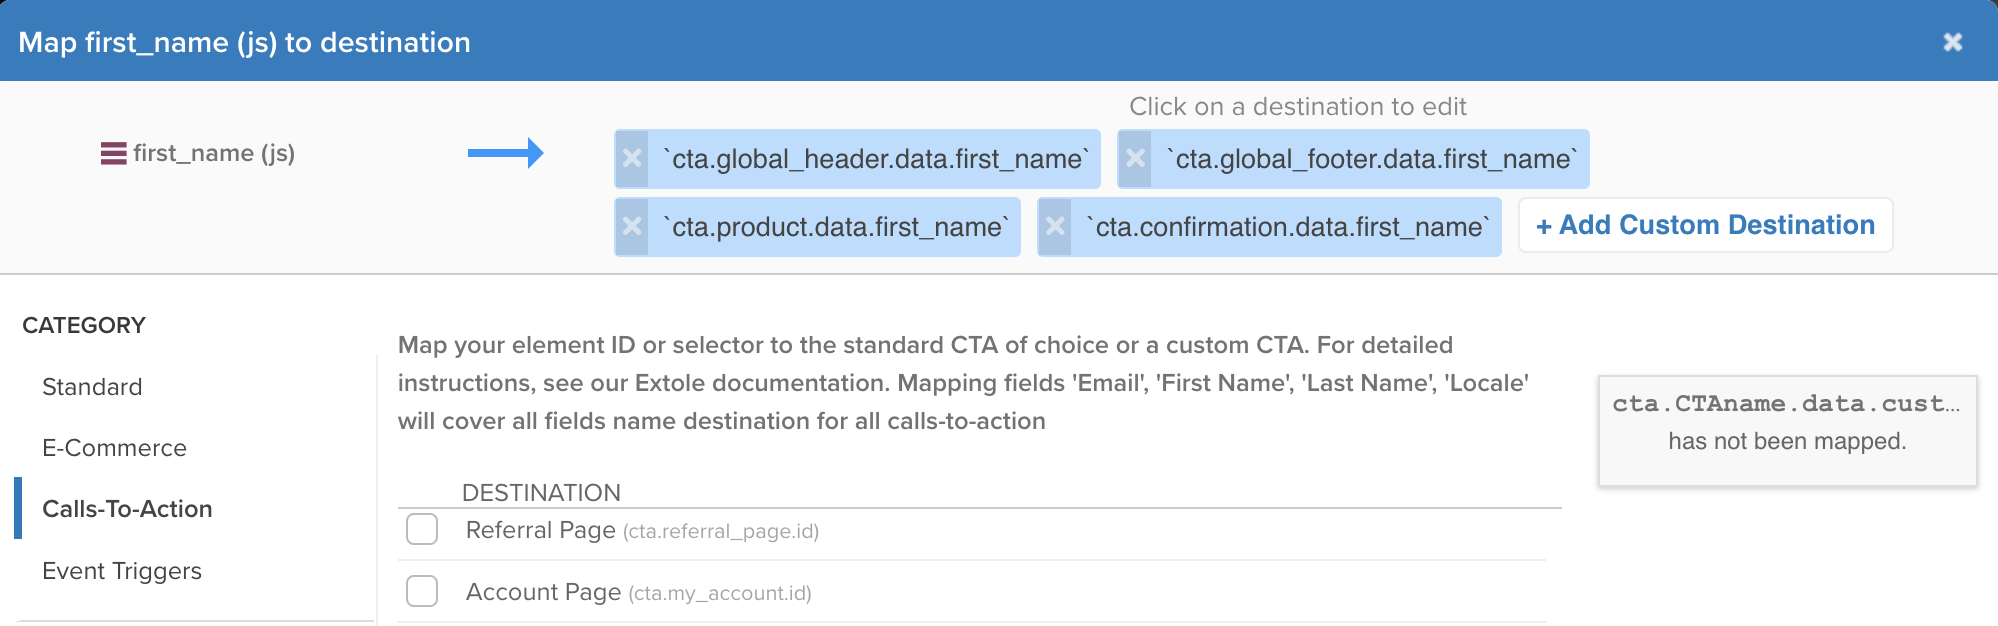
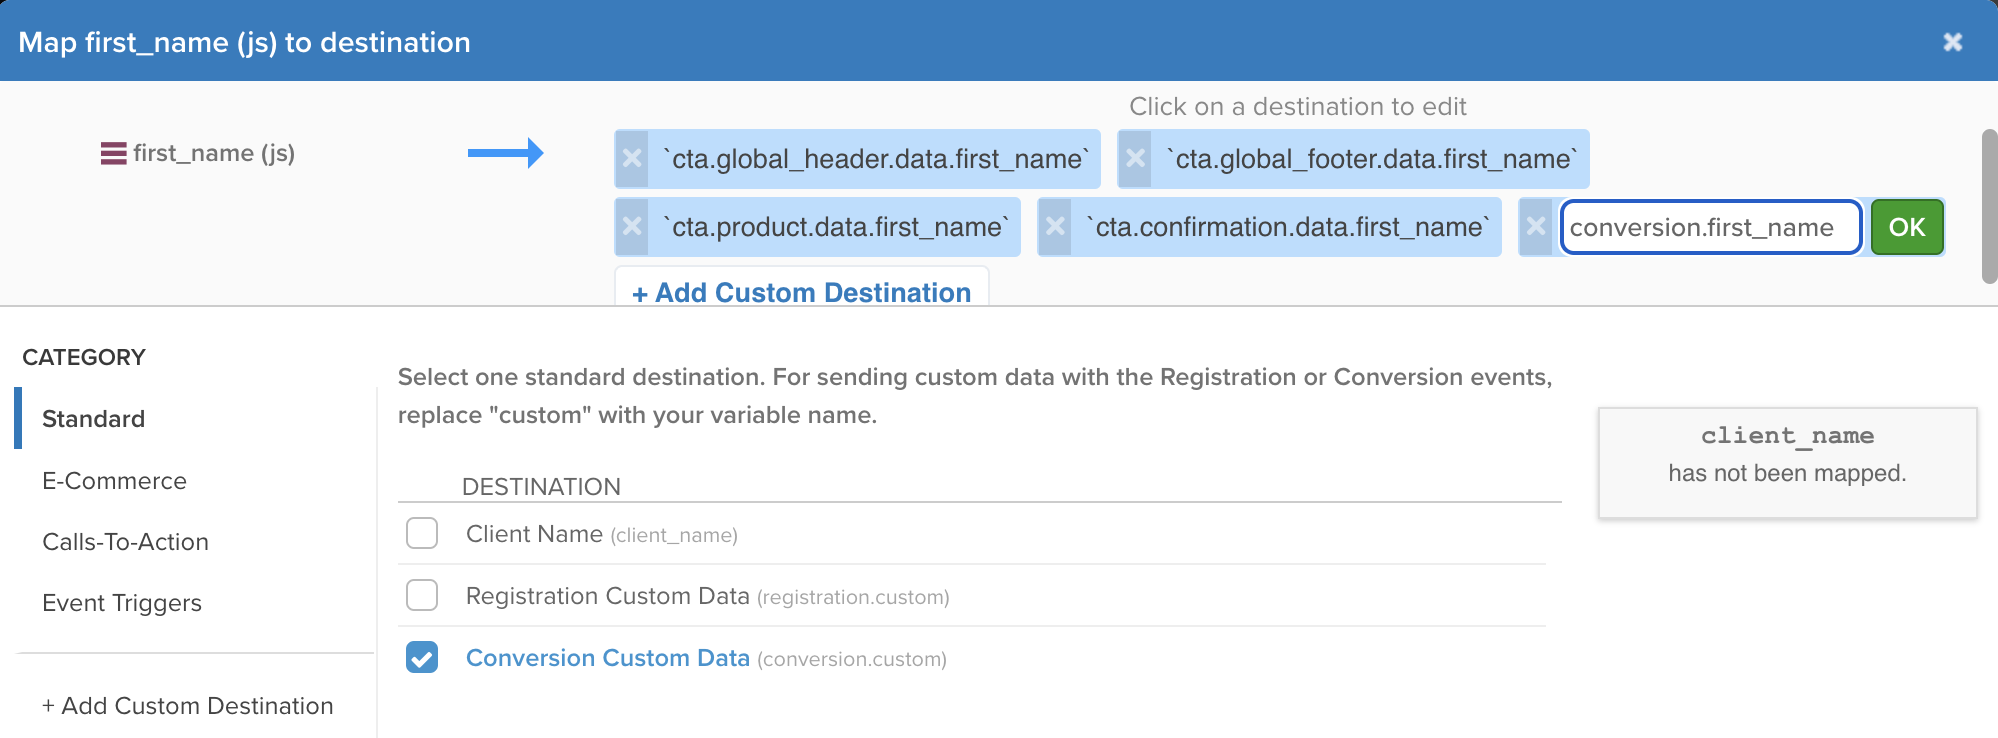
- Next, on the same screen, map the Conversion tag by selecting the category Standard and checking the box for Conversion Custom Data.
- A custom destination,
conversion.custom, will appear. Update the destination value toconversion.first_name.
Setting a Conversion Destination for first_name in Tealium
- Next, on the same screen, map the Registration tag by selecting the category Standard and checking the box for Registration Custom Data.
- A custom destination,
registration.custom, will appear. Update the destination value toregistration.first_name. - Now your
first_namevariable is fully mapped. Repeat the above process for all remaining data variables. The full list of data mappings for each variable are listed in the table below.
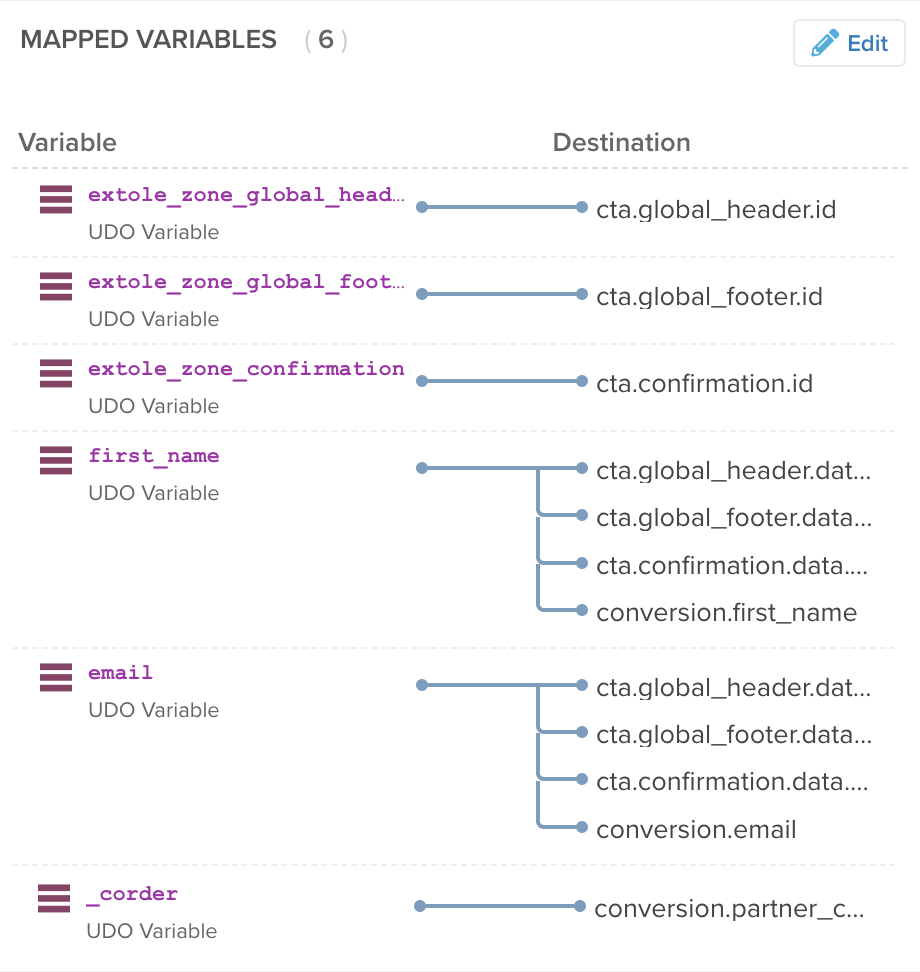
Example of Mapped Variables and their Destinations in Tealium
Variable | Mappings |
|---|---|
|
|
|
|
|
|
|
|
|
|
|
|
|
|
|
|
|
|
|
|
|
|
Updated 6 months ago